
Be yourself; Everyone else is already taken.
— Oscar Wilde.
This is the first post on my new blog. I’m just getting this new blog going, so stay tuned for more. Subscribe below to get notified when I post new updates.
Be yourself; Everyone else is already taken.
— Oscar Wilde.
This is the first post on my new blog. I’m just getting this new blog going, so stay tuned for more. Subscribe below to get notified when I post new updates.
In the past few days in my cooking class we made our own personal pizzas using flavor star. Flavor star is the combining and balance of flavors to make good savory tasting dishes in cooking. There are 5 different types included in the flavor star which are salty (umami), sweet, spicy, bitter, and sour. The salty/umami part in flavor star fixes un-seasoned dishes and makes them less bland because that is a common mistake in cooking. The sweet flavor usually balances out the sour, bitter, and spice to make something more interesting in flavor star. The spice in flavor star adds a kick to the food and balances the sour and sweet in dishes. In flavor star, the bitter flavor balances out the sweet and salty flavors and maybe helps when eating veggies. Finally, the sour flavor in flavor star balances the spice and sweetness flavors and alo counteracts with heat to make dishes more delicious. In my pizza I used sour, spicy, bitter, and a little sweet flavor to give my dish a nice zesty italian flavor. I used crushed red pepper to give it a spicy kick. The garlic power was already in the recipe but I also put parsley in the sauce to give it that bitter flavor and to balance out the basil and paprika that I used for the sweet flavor in flavor star. Finally, I put tomato sauce and paste in my sauce to give my pizza that pizza look and flavor then put lemon juice in it to give the sauce that zesty flavor.
In the pizza that I made for the lab it didn’t come out as I expected to be honest but I made it work. The pizza in the end looked small and jumbled together bt that is because i didn’t roll it out and get the air pockets out good enough. The sauce and cheese on the top of the pizza came out good because I made it into a smiley face. The aroma of the pizza smelled good. The dough itself smelled like bread and the sauce had a spicy kick so it also smelled good. Finally, the taste of the pizza was good. Since the pizza was small the pieces were small but also thick so it was different to me but it tasted like a lunchable. The overall product I got was pretty good because it ended up like a lunchable in the end.
Day 1
| Ingredients from prep table: | 1 pkg active dry yeast |
| 4 cups (bread) flour | |
| 2 tsp salt | |
| 2 Tbs sugar | |
| 1/3 c olive oil | |
| 1 ½ c warm water | |
| Equipment from prep table/area/pantry: | Baggie labeled with period and kitchen numbers |
| Equipment from kitchen: | Bench scraper |
| Measuring tools | |
| Mixing bowls | |
| Wooden spoon |
| Time on clock: | # of minutes: | Step #: | Directions: |
| 5 | 1 | Cell phones in holder Listen to class directionsTie up hair, check clothing Wash hands Grab apron, dish towels, and dish rag (backroom)Start dishwater | |
| 1 | 2 | Set out tray with lab plan & equipment on it, measure and take back ingredients | |
| 5 | 3 | Combine sugar, yeast, and warm water in a small bowl and allow to activate | |
| 2 | 4 | Combine flour, and salt into large mixing bowl | |
| 2 | 5 | Stir oil into flour and salt until completely blended | |
| 5 | 6 | Pour yeast mix over flour and stir with a wooden spoon until no more flour can be stirred in with spoon | |
| 15 | 7 | Knead vigorously until dough passes window pane test | |
| 1 | 8 | Put in vented gallon baggie and store in designated area | |
| 1 | 9 | Complete rubric and turn in | |
| 5 | 10 | Wash and thoroughly dry dishes. Return dishes to their correct spot. | |
| 1 | 11 | Take aprons back to rack and put dirty dish towels in washing machine | |
| 1 | 12 | Call Miss Fenn over for checkout (you may have some additional tasks) | |
| 1 | 13 | Take lab plans back to binder, have a seat. |
Day 2
| Ingredients from prep table: | Your sauce ingredient selection |
| Suggestion for a starting point in your sauce:1/4 c tomato sauce 1 1/2 tsp tomato paste 1/4 tsp oregano 1/4 tsp basil 1/4 tsp garlic powder 1/4 tsp paprika 1/2 tsp sugar | |
| Equipment from prep table/area/pantry: | Baggie labeled with name on sticker |
| Saucepans with lids | |
| Equipment from kitchen: | Measuring equipment |
| Mixing bowls |
| Time on clock: | # of minutes: | Step #: | Directions: |
| 1 | 1 | Cell phones in holder Listen to class directionsTie up hair, check clothing Wash hands Grab apron, dish towels, and dish rag (backroom)Start dishwater | |
| 10 | 2 | Each person gather own ingredients with measurements | |
| 5 | 3 | Mix ingredients, taste, adjust | |
| 10 | 4 | Mix together sauce ingredients and simmer on low for 10 minutes | |
| 5 | 5 | Let sauce cool, taste and make adjustments | |
| 5 | 6 | Store sauce in designated area | |
| 5 | 7 | Wash and thoroughly dry dishes. Return dishes to their correct spot. | |
| 1 | 8 | Take aprons back to rack and put dirty dish towels in washing machine | |
| 1 | 9 | Complete rubric and turn in | |
| 1 | 10 | Call Miss Fenn over for checkout (you may have some additional tasks) | |
| 1 | 11 | Take lab plans back to binder, have a seat. |
Day 3
| Ingredients from prep table/area: | Sauces |
| Dough | |
| 1/4 c cheese per person | |
| 1 tsp cornmeal per person | |
| Cooking spray | |
| Equipment from prep table/area/pantry: | 1 cookie sheet per person |
| Plates | |
| Equipment from kitchen: | Spatula |
| Pizza cutter |
| Time on clock: | # of minutes: | Step #: | Directions: |
| 1 | 1 | Cell phones in holder Listen to class directionsTie up hair, check clothing Wash hands Grab apron, dish towels, and dish rag (backroom)Start dishwater | |
| 1 | 2 | Preheat oven to 400 degrees F | |
| 1 | 3 | Set out tray with lab plan & equipment on it | |
| 1 | 4 | Take tray to prep table to get ingredients/equipment in one trip | |
| 3 | 5 | Divide dough evenly between lab group members for each person to make their own personal pizza | |
| 2 | 6 | Spray cookie sheets with cooking spray and dust with corn meal | |
| 10 | 7 | Flatten dough out very thin on cookie sheet and bake for 8-10 minutes | |
| 10 | 8 | QUICKLY take dough out of oven and top with sauce and cheese then return back to oven for about 10 minutes until thoroughly cooked | |
| 10 | 9 | Eat | |
| 2 | 10 | Wash and thoroughly dry dishes. Return dishes to their correct spot. | |
| 1 | 11 | Take aprons back to rack and put dirty dish towels in washing machine | |
| 1 | 12 | Complete rubric and turn in | |
| 1 | 13 | Call Miss Fenn over for checkout (you may have some additional tasks) | |
| 1 | 14 | Take lab plans back to binder, have a seat. |
In the last few weeks I made French Baguettes and Cinnamon Rolls using yeast. I learned what yeast is and the techniques that helped make the bread how it turned out. You have to make sure when the yeast is mixed in with the water it is between 105-110 degrees F. To activate the yeast you have to add water, salt, and a sweetener like sugar to give the yeast food so it grows. Gluten is a substance in all breads that come from yeast that give the dough its elastic texture. In the process of making bread you have to knead and punch the dough to enable the dough to rise and also get the excess air out of it after it is kneaded. Depending on the bread you are making you have to shape and dock it. You have to shape it because you can’t leave it in a clump of dough, it helps the dough cook better and give it better form. You have to dock the dough to get the air sockets out of the dough and also to help the dough expand better.
In the making of the French Baguettes…. It was easier than the cinnamon rolls. It was also the first thing we made using the yeast. The end product was pretty good. Ashley and I made a braided bread and then the french baguette and they both looked good. They both were golden brown because of the egg wash and actually looked like something that came from a bakery to me. It also smelled good in the end, but it smelled disgusting in the beginning because of the yeast. The crust of the bread was really crispy and crunchy when I tasted it at the end but it was still pretty good. The inside was soft which is a good contrast with the outside and inside of the bread. The product turned out really good and makes me want to go home and make more…
Day 1
| Ingredients from prep table: | 2 envelopes dry active yeast (1 ½ Tablespoons) |
| 2 Tablespoons honey | |
| 1/2 cup water plus an additional 1 cup warm water | |
| 3 1/2 to 4 cups flour | |
| 2 teaspoons salt | |
| Cooking spray | |
| Equipment from prep table/area/pantry: | 1 plastic baggie, inside sprayed with cooking spray |
| Sticker with lab names, period number, and kitchen number | |
| Equipment from kitchen: | Measuring equipment |
| Mixing bowl | |
| Bench scraper | |
| Wooden spoon |
| # of minutes: | Step #: | Directions: | |
| 5 | 1 | Cell phones in holder Listen to class directionsTie up hair, check clothing Wash hands Grab apron, dish towels, and dish rag (backroom)Start dishwater | |
| 1 | 2 | Set out tray with lab plan & equipment on it | |
| 5 | 3 | Take tray to prep table to get ingredients/equipment in one trip | |
| 5 | 4 | Combine the honey, yeast and ½ c of water (105-110 degrees), stir, let sit for 5 minutes | |
| 1 | 5 | Mix the flour and salt, then slowly add the yeast mixture. | |
| 5 | 6 | Add the additional 1 c water a little at a time (you may not need it all) until dough form ball that isn’t too sticky | |
| 1 | 7 | Dust counter with flour | |
| 10 | 8 | Knead dough on dusted spot until smooth and elastic | |
| 1 | 9 | Shape dough into ball | |
| 1 | 10 | Put dough ball in baggie and seal 3/4 of the way shut | |
| 1 | 11 | Label and place dough in designated spot | |
| 1 | 12 | Complete rubric and turn in | |
| 5 | 13 | Wash and thoroughly dry dishes. Return dishes to their correct spot. | |
| 1 | 14 | Take aprons back to rack and put dirty dish towels in washing machine | |
| 1 | 15 | Call Miss Fenn over for checkout (you may have some additional tasks) | |
| 1 | 16 | Take lab plans back to binder, have a seat. |
Day 2
| Ingredients from prep table: | 1 Tablespoon cornmeal |
| Bread dough | |
| Cooking spray | |
| Equipment from prep table/area/pantry: | 1 cookie sheet |
| Plastic wrap | |
| Sticker with lab names, period number, and kitchen number | |
| Equipment from kitchen: | Bench scraper |
| Paring knife | |
| Measuring supplies |
| Time on clock: | # of minutes: | Step #: | Directions: |
| 5 | 1 | Cell phones in holder Listen to class directionsTie up hair, check clothing Wash hands Grab apron, dish towels, and dish rag (backroom)Start dishwater | |
| 1 | 2 | Set out tray with lab plan & equipment on it | |
| 5 | 3 | Take tray to prep table to get ingredients/equipment in one trip | |
| 2 | 4 | Punch dough and push out any remaining gas bubbles | |
| 1 | 5 | Divide dough in two | |
| 5 | 6 | Take first half and shape into baguette by taking each side the top and bottom half and folding over into middle until dough is 12-14 inches long | |
| 5 | 7 | Repeat with second half of dough | |
| 1 | 8 | Evenly dust cookie sheet with cornmeal | |
| 1 | 9 | Place shaped dough on cookie sheet and dock with paring knife | |
| 1 | 10 | Spray dough with cooking spray | |
| 1 | 11 | Loosely cover dough with plastic wrap | |
| 1 | 12 | Label and place dough in designated spot | |
| 1 | 13 | Complete and turn in rubric | |
| 5 | 14 | Wash and thoroughly dry dishes. Return dishes to their correct spot. | |
| 1 | 15 | Take aprons back to rack and put dirty dish towels in washing machine | |
| 1 | 16 | Call Miss Fenn over for checkout (you may have some additional tasks) | |
| 1 | 17 | Take lab plans back to binder, have a seat. |
Day 3
| Ingredients from prep table: | 1/2 cup of heavy whipping cream |
| Pinch of salt | |
| Dough | |
| 1 egg white | |
| 1 TBS water | |
| Equipment from prep table/area/pantry: | Serrated knife |
| Mason jar with lid | |
| Butter knife | |
| Plates | |
| 1 rubric per group | |
| 1 lab eval per person | |
| Equipment from kitchen: | Measuring supplies |
| Time on clock: | # of minutes: | Step #: | Directions: |
| 5 | 1 | Cell phones in holder Listen to class directionsTie up hair, check clothing Wash hands Grab apron, dish towels, and dish rag (backroom)Start dishwater | |
| 1 | 2 | Set out tray with lab plan & equipment on it | |
| 4 | 3 | Take tray to prep table to get ingredients/equipment in one trip | |
| * | 4 | Preheat oven to 450 degrees F | |
| 20 | 5 | Bake dough for approximately 15 mins or until it is hard when knocked, lightly brush egg wash halfway through baking | |
| * | 6 | Put cream and salt in mason jar and shut lid tightly | |
| * | 7 | Shake cream jar as hard as you can until a ball forms | |
| * | 8 | Rinse butter ball under cold water and shape with hands | |
| 5 | 9 | Eat | |
| 1 | 10 | Complete rubric (1 per group) | |
| 1 | 11 | Complete lab eval (1 per person) | |
| 5 | 12 | Wash and thoroughly dry dishes. Return dishes to their correct spot. | |
| 1 | 13 | Take aprons back to rack and put dirty dish towels in washing machine | |
| 1 | 14 | Call Miss Fenn over for checkout (you may have some additional tasks) | |
| 1 | 15 | Take lab plans back to binder, have a seat. |
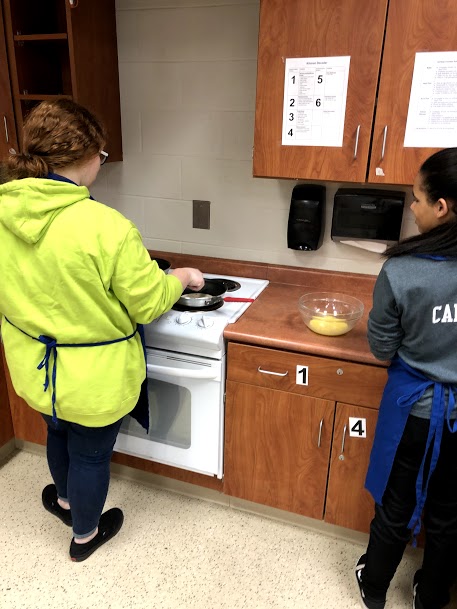
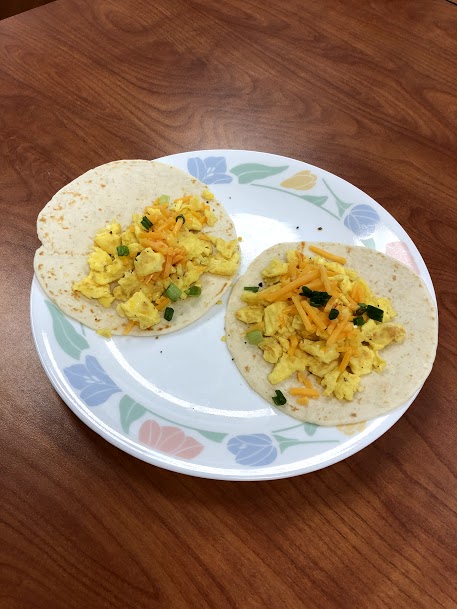
The first lab that was done in advanced cooking is the breakfast tacos. In the breakfast tacos I made there were eggs, cheese, salt, pepper, green onions, tortillas, and hot sauce in it. We had to cook the eggs until they reached 160 degrees fahrenheit because if not we would get salmonella. You could also get foodborne illness from not cooking the eggs all the way. Throughout the lab, my friend Ashley and I cleaned up as we went to keep the kitchen clean and safe from any germs and dangerous things such as the knife we used or the bowl we kept the raw eggs in. We put the knife by the sink to be washed when we were done and put the bowls in the sink and washed them to keep germs from spreading and to keep the kitchen sanitated. We also used a plastic spatula to cook the eggs because if we didn’t the non-stick part of the pan would be scraped off and then it would be problematic because eggs would get in the scrapes and we’d eat it. Lastly the evaluation, at the end of the lab we had to do an evaluation to judge yourself on how you did and what you could to better next time to help.
After making the breakfast tacos we did the evaluation. Included in that was the aroma, taste, and what it looked like…. basically the product of the food. For the aroma I thought it smelled pretty good with the couple drops of hot sauce I added to give it a pop of flavor. I also smelled the eggs and the green onion which came together to smell pretty good. My ending product looked tasty also, I don’t really like eggs as much so personally I didn’t think I’d like it but it turned out okay. How it felt…. I mean it felt like a soft taco with the tortilla but the eggs were a different story!!! The eggs felt slimy and not good from my perspective. So that was my description of the product of the breakfast tacos I made with Ashley. 🙂
| Ingredients from prep table: | 2 eggs per lab member |
| 2 TBS cheese per lab member | |
| 2 tortillas per lab member | |
| 1 can cooking spray | |
| Salt, pepper, green onions, salsa, and/or hot sauce for topping | |
| Equipment from prep table/area: | 2 frying pans |
| 1 plate per person | |
| Equipment from kitchen: | Measuring supplies |
| Whisk | |
| Mixing bowls | |
| Plastic spatula |
| Time on clock: | # of minutes: | Step #: | Directions: |
| 5 | 1 | Cell phones in holder Listen to class directionsTie up hair, check clothing Wash hands Grab apron, dish towels, and dish rag (backroom)Start dishwater | |
| 1 | 2 | Set out tray with lab plan & equipment on it | |
| 1 | 3 | Take tray to prep table to get ingredients/equipment in one trip | |
| 1 | 4 | Heat pan(s) over medium heat | |
| 5 | 5 | Place one tortilla at a time in pan and cook until you start to see some light browning | |
| 1 | 6 | Place warmed tortillas on plate | |
| 1 | 7 | Scramble two eggs using a whisk in bowl | |
| 1 | 8 | Heat second pan over medium heat and spray with cooking spray | |
| 5 | 9 | Pour eggs into hot pan and stir constantly scraping the cooked egg with each movement | |
| 5 | 10 | Cook until eggs are no longer runny | |
| 1 | 11 | Add salt and pepper | |
| 1 | 12 | Top warmed tortilla with cooked eggs | |
| 1 | 13 | Add cheese and toppings | |
| * | 14 | Each member repeats process | |
| 7 | 15 | Eat | |
| 5 | 16 | Wash and thoroughly dry dishes. Return dishes to their correct spot. | |
| 1 | 17 | Complete rubric and turn in | |
| 1 | 18 | Take aprons back to rack and put dirty dish towels in washing machine | |
| 1 | 19 | Call Miss Fenn over for checkout (you may have some additional tasks) | |
| 1 | 20 | Take lab plans back to binder, have a seat. |
Onna
11th Grade
I can draw
To learn to cook for the real world.
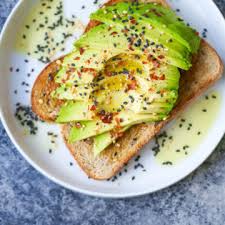
To learn how to make avocado toast.
This is an example post, originally published as part of Blogging University. Enroll in one of our ten programs, and start your blog right.
You’re going to publish a post today. Don’t worry about how your blog looks. Don’t worry if you haven’t given it a name yet, or you’re feeling overwhelmed. Just click the “New Post” button, and tell us why you’re here.
Why do this?
The post can be short or long, a personal intro to your life or a bloggy mission statement, a manifesto for the future or a simple outline of your the types of things you hope to publish.
To help you get started, here are a few questions:
You’re not locked into any of this; one of the wonderful things about blogs is how they constantly evolve as we learn, grow, and interact with one another — but it’s good to know where and why you started, and articulating your goals may just give you a few other post ideas.
Can’t think how to get started? Just write the first thing that pops into your head. Anne Lamott, author of a book on writing we love, says that you need to give yourself permission to write a “crappy first draft”. Anne makes a great point — just start writing, and worry about editing it later.
When you’re ready to publish, give your post three to five tags that describe your blog’s focus — writing, photography, fiction, parenting, food, cars, movies, sports, whatever. These tags will help others who care about your topics find you in the Reader. Make sure one of the tags is “zerotohero,” so other new bloggers can find you, too.
"Food- A necessary part of a complete life."
A daily selection of the best content published on WordPress, collected for you by humans who love to read.
"Food- A necessary part of a complete life."
Longreads : The best longform stories on the web
The latest news on WordPress.com and the WordPress community.
